Showing posts with label writing. Show all posts

Tuesday, May 10, 2011

Chicks - Week 2: Drawing Chicks

These are our last few days with the chicks.  The children are really involved with observing and documenting their growth and the changes they see.  Here are a few pictures of them drawing the chicks from real life.  This is an important process.  This looks like an art project, but really it is also a scientific process and a pre-writing activity.  Children have to observe closely and pay attention to detail when drawing from real life.  It is a great idea to keep a spiral notebook or other writing notebook with you when you travel in the car, out to eat or to the store.  Ask your child to draw what they see.  People, food, places.  Doing this multiple times at the same place (like the grocery store) shows you how their drawing/writing skills improve with practice.  Drawing and writing are basically the same.  You have to learn how to make lines to form symbols that represent what you see (or to make meaning on paper).  Most of us were raised learning to write by having to write spelling words over and over and over again and dreading it!  During this activity many of the children were independently trying to write or they were finding other ways to use letters to represent and remember their thoughts and feelings.  This is how you raise a child who loves to write, loves words and loves to learn.  This is a very different approach to writing than most of us were raised with.  I hope these pictures help you see how successful, involved and excited these children were about writing and drawing.  Try this at home.  You don't need chickens to do this, just find something that sparks your child's interest.  Even trying to draw Sponge Bob will do!  Then have them draw a real sponge and compare the two.  Just have fun.  Oh, and you have to draw too.  You have to model what you want them to do.  Enjoy the pictures and I threw in one video not related directly to the drawing project just for fun.

The drawing/writing lesson started out by asking the children to look at how much the chicks had changed over the past week.  They noted that the biggest change was that the chicks were getting feathers and were starting to fly.

For the morning and afternoon classes we placed a few chicks on the table (with newspaper underneath, you know why!) and a laundry basket on top so they could see the chick and gave them paper and crayons.  We asked them to draw what they saw.  Those were the only instructions.  It is best to leave this type of activity as open-ended as possible.

Here the chicks are patiently waiting as the children start the process of drawing what they see. 

Busy hands, busy chicks. 

You can see that different children are at different stages of their writing abilities, but they are all deeply involved in the process.   It IS NOT about the results, it is about them being excited, involved and proud of their efforts that count.
Notice how the children are working side by side without comparison or competition.  Each child could tell us about their picture and what it represented.  Even though the drawing may not have much meaning to you, it has a lot of meaning to the child.  Avoid the standard "that is beautiful" and use more meaningful statements and questions such as "what do you like best about your picture?", "why did you pick those colors for your drawing?", "tell me about this part of your drawing?" and/or "what is you favorite part about your drawing?".  This creates children that are intrinsically motivated to do work and are not working just to get peer or adult praise.  These type of comments and questions show the children you are really connected and encourage children to do work because they enjoy it and find their work meaningful.  This leads to self-motivation and can help keep children from becoming acceptance seekers (which can lead to giving  in to peer pressure as they get older).

During our meeting time at carpet we looked closely at the chicks and compared how many toes they had to how many toes we had.  We took off our shoes and counted.  We looked at a chick and counted.  At first they thought the chicks had three toes, but when they looked closer (on closer investigation is the vocabulary we used with them) they realized that the chicks actually had FOUR toes.  One toe is smaller than the others and is hidden in the back of the foot for balance.  This child remembered that detail and added it into his drawing of the chick.  

This child is proudly showing the chicks their portraits.  A masterpiece I would say, don't you agree?

This child not only started a drawing, but also wanted to write the baby chicks name for him.  Here she is "reading" baby chicks name to him.  She then very proudly hung the picture up on the wall (but then took it down and wanted to take it home).  She independently went and found the foam letters and started writing with crayons and gluing the foam letters on her paper.  This was not part of the lesson, but she felt inspired to do this.  She was allowed, encouraged and supported to explore letters and incorporate her ideas into the "art" lesson.  This is one of the reasons we try to leave the activities open-ended and not give too many instructions.  The children need room to grow and explore, and by expecting every child to turn out cookie cutter type projects (where every project looks the same and it is obvious the teacher did most of the work) it hampers the children's growth and development and can actually keep them from learning as fast as they are naturally capable.


This video shows them exploring the chicks and looking at their wings.  They are also just enjoying being kids and spending time just basking in the wonder of holding something so much smaller than them. 

Wednesday, April 27, 2011

THE EGGS HAVE ARRIVED!

The eggs have arrived to room 411 direct from the farm!  The children are excited and the teachers are excited. I am not too sure how excited the chicks are yet, but I bet they can't wait to meet us.  We have taken lots of pictures so we can revisit this experience anytime we want to and so all of our friends that have been out sick this week can see what we have been doing while they have been home getting better.  We have lots of pictures to share and some video too.  We hope you enjoy this adventure.  The chicks should hatch in about a week.  Hopefully some of them will wait to hatch until the children are there to witness the event.  If we are lucky enough to be there we will video it and post it on the blog.

Here are the eggs.  Ms. Linda brought these to our classroom.  They came from the farm and had to be kept in this cooler so the eggs would stay warm until we could get them into the incubator.

Here is a close up of one of our eggs.  We are going to candle them so we can see if a baby chick is inside.

Ms. Sarah adds arrows and X's on the eggs so we know which direction to rotate and roll the eggs.  We have to do this 3 to 5 times a day.  The mommy chicken does this when she sits on the eggs at the farm.  This keeps the eggs warm (around 100 degrees).  Ms. Sarah does this since the mommy chicken has to stay at the farm.  The chick eggs have to be rotated under the light bulbs in the incubator so they don't get too hot or too cold.  Ms. Sarah makes a great mommy chicken!

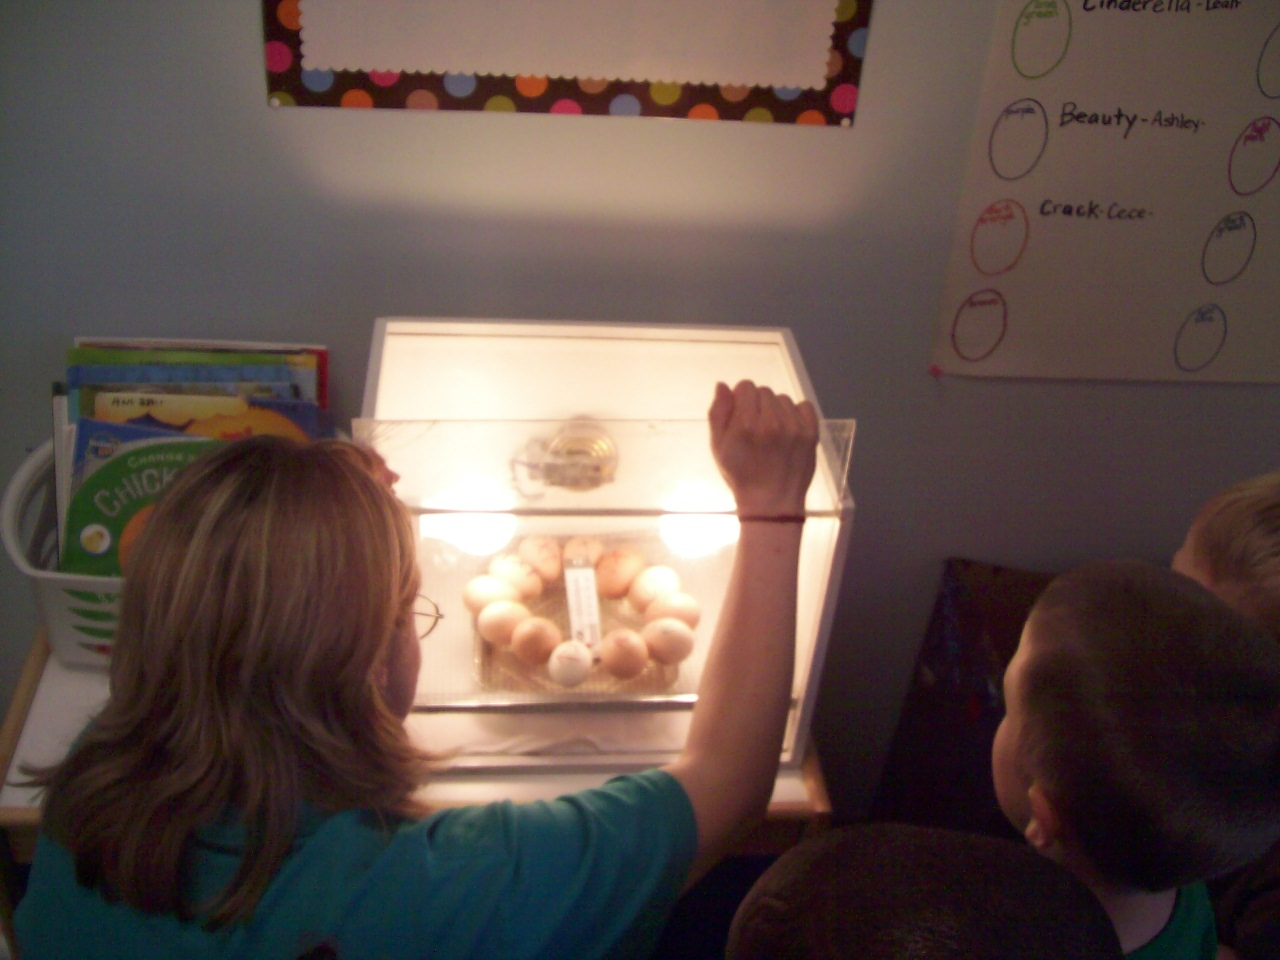
The thermometer lets us know that the incubator is just the right temperature for the eggs.  The pan of water keeps the air moist.  This is just the right environment for the chicks to finish developing until they hatch.


Here are all 12 of our eggs.  Each has a different color X on them so we know which egg belongs to which chick when we candle them.

Ms. Sarah and the children start making the egg chart so we can track and name the chicks in the eggs.

Here is the chart before we name the chicks and candle the eggs.  We hope all 12 eggs have been fertilized and have baby chicks in them.  We will find out very soon.  We will post all of the chicks names when all of our friends are healthy and back to school.  Each child gets to pick a name so we are going to wait until every child gets to name an egg/chick before unveiling the names.

Ms. Sarah gets ready to take us into a dark room with the eggs so we can "candle" them and look inside to see if they have baby chicks in the eggs.  All of the children are very excited.  Some of the children are a little bit confused because they have never done this before.  This is a great learning experience and a wonderful opportunity to expand vocabulary.

Ms. Sarah uses a projector with a very bright light bulb to look inside the egg.  The projector has been modified to make the beam of light very small and focused.


Here is the first video of Ms. Sarah candling the first set of eggs with two children.  The video gets very dark but you can hear great conversation with the children.  If you look closely you can see some movement within the egg.  I have to admit we still find this just as exciting as the children when we get to see the movement of the baby chicks inside the eggs!  In some of the videos you can see the blood vessels also.

The children get up close and are really involved in investigating the egg and the movement inside the egg.  The room is very dark and the children can see inside the egg but the flash on the camera makes it look like the lights are on.  This seems to be the first moment that the children make the connection that something alive is inside the egg and will try to come out soon.


This is the second video.  It is shorter but the excitement shown by the children is priceless!

 
We have rearranged the classroom to create an entire space devoted to the observation and documentation of the egg hatching and baby chick project.  The children have access to books, writing supplies and comfortable seating so they can watch the eggs and hopefully watch them hatch next week.  The children can come over anytime during the day and observe and document their observations.  After the chicks hatch the children will be able to watch the chicks for the next week or two and observe the changes the chicks go through.  We will write more about that in another post.

These children are drawing eggs and writing letters to the baby chicks.  This activity was spontaneous which is what makes this type of learning so important.  These children WANT to write and want to record what they are experiencing and that is what creates lifelong readers and writers.  Writing activities must be meaningful and relevant in order for children to be interested and excited about writing.


This is another example of a child writing.  This child used a book in the egg watching area AFTER he candled an egg to learn more about what was going on inside the egg.  He was doing research to learn more and he did this independently.  This was the page he found and wanted to talk about.  About 30 minutes later he brought this picture to me and asked if he could hang it up on our chick art wall.  Even though he no longer had the book out, I knew immediately what he had drawn!  I was so excited.  Representational drawing is a critical skill children need to develop but often do not have the opportunity to practice.  It will be interesting to see how the children's drawings develop over the next few weeks as they learn more chicks and experience more during this project.  One way we can document how much the children are learning is by observing and gathering evidence showing how much detail is emerging in their drawing/writing.


Welcome to Egg Central.  This is the area we created for the children to observe, record, relax, draw, watch and display their art work/writing.  The children are spending a lot of time in this area.  The area is large enough that all of the children will have room to watch the chicks hatch when the time comes.  I will take pictures of each component of this area and detail what the purpose is as it relates to child development in the next post.
 
In the last picture this child wanted to start creating a new home for the baby chicks when they hatch.  She was very excited to share her building with us.  Even though we could not keep the building and had to explain that the baby chicks would climb out of it, she asked if we could take a picture.  She wants to keep practicing and she wants to make a play house for the baby chickens when they hatch.  We are going to keep working on this project and will keep taking photos and see where this leads for this child.


Saturday, November 13, 2010

Drawing Dinosaurs

After snack while we are waiting for everyone to finish the children are encouraged to either draw in their journals or read books.  This child decided to do both.  I found her in library area on the sofa with the dinosaur dictionary on her lap with her journal open with her pencil busily moving across her paper.

Ms. Carole Dawn, "What are you drawing?"
Ashley, "A stegosaurus."
Ms. Carole Dawn, "Cool.  How do you know it is a stegosaurus?"
Ashley, "Because it has spines on its back, see?  Look in the book Ms. Carole Dawn, it looks just like the stegosaurus in the book.  Let me show you."
Ms. Carole Dawn after looking at the picture of the stegosaurus that Ashley showed her in the book, "You are right, stegosauruses do have spines on their backs!"
Ashley smiles at Ms. Carole Dawn like Ms. Carole Dawn is about the dumbest teacher that has ever lived.  Ms. Carole Dawn smiles like Ashley is about the smartest preschooler that ever lived!


Thursday, October 28, 2010

Drawing Pumpkins

When we went to Daniels Farm we picked out several pumpkins to use in our activities during the fall unit.  One of the activities the children really enjoyed was drawing the pumpkins in their journals.  This is a pictorial documentation of one day of the activity.  They repeated this activity over several days using different pumpkins and gourds.

First we set out one of the pumpkins in dramatic play on the table.  We placed orange and green crayons, markers and some pencils on the table.  We left them there and did not give any special instructions to the children.  The children independently came over to inspect the pumpkin.  Some of the children went and got thier journals out of their cubbies.  They sat down and started drawing what they saw.  The process was amazing to watch.  The language they used in their conversations with each other during the activity was also amazing to listen to.  They talked about the field trip, what they thought was inside the pumpkin, what they were going to wear for Halloween and lots of other unrelated topics.  The children floated in and out of the activity and the mix of children changed often.  This was a great language and literacy activity and the kids had a great time!
We put out the green and orange pumpkin to see if the children would observe the multiple colors and not just color the typical orange pumpkin they see in their minds eye.  This increases their power of observation which is needed for reading and writing in the primary grades and for science activities.

See how this child is using two colors and forming a circle for the shape of the pumpkin.

This child used both the orange and the green seen in the pumpkin and also added a face like she would see in a jack-o-lantern.  When asked about the face she said it was like the one she carved into her pumpkin with her family the night before at her house.  This shows a connection between a present experience and a past experience.

 This was this child's first attempt at drawing the pumpkin.  Notice how large the pumpkin is.  Often the first time representing something in a drawing it is difficult and multiple attempts and practice is needed. 

In this picture you can see how in one journal a child started to add the lines they saw on the pumpkin.  The child in the picture is the same child you see in the previous picture.  She drew the pumpkin multiple times practicing and enjoying the process. You can see she is now drawing the pumpkin smaller and the circle is tighter.  She has spent time studying the pumpkin and is becoming more focused on the details.

 By drawing the pumpkin the children are preparing to make the curves (circle motion) that will be needed to make the curved lines in the upcoming Handwriting Without Tears lessons for the letters with curved lines such as C,D,O,G,Q.

This child is working on their second picture of the pumpkin.  She started with the orange color and and is getting ready to overlay the green over the top.  This shows a different way to look at the formation of the pumpkin and how they see the texture and depth of the colors.

You can see in this picture that this child is enjoying exploring using different writing tools.  He is making lines, scribbles and swirls.  He is also representing the different colors seen in the pumpkin.  He is participating with his peers in the process and feeling very proud of his accomplishments.  He later proudly showed off his pumpkin to his teachers and drew several more pictures in his journal.


Wednesday, October 6, 2010

More Handwriting Without Tears

Over the past month the children have learned the capital letters L, E, F and now they are learning H.  Here are some pictures of the AM and PM class working with Ms. Brenda and Ms. Jenny to learn how to correctlly build these letters.  You can use play dough, sticks, popcycle sticks and other items to create these letters.  We hope these pictures help you and your child practice these letters at home


Mat Man


Ms. Brenda teaches the PM class HWT (our printing letters program) every Tuesday afternoon.  She started by teaching the students about Mat Man.  The curriculum also has a song about Mat Man.  Mat Man is made up out of big lines and little lines, big curves and little curves.  All letters are also made up of big lines and little lines, little curves and big curves.  Mat Man is the basis of all letters the children will learn to draw this year.

Ms. Brenda making Mat Man's head with two big curves.


One of the children drawing Mat Man on a dry erase board.

Another child drawing Mat Man using big lines and little lines, big curves and little curves for the arms, legs, head, ears, hands and feat.  He is really paying attention to the details after helping Ms. Brenda build Mat Man and sing the song.

Another interpretation of Mat Man.  This student called him "Fat Man".


Ms. Brenda and one of the student's building Mat Man together.

Ms. Brenda showing the students the difference between a big line and a little line.  You can also call them long lines and short lines.

Thursday, September 2, 2010

Handwriting Without Tears

Handwriting Without Tears click here to go to the Handwriting Without Tears website.

At United Services we use the curriculum called Handwriting Without Tears to teach our students how to print.  We are lucky that our OT, Ms. Jenny, comes in once a week to do a group lesson with the children to work on drawing letters.  There is a specific sequence to teaching the letters.  Our first lesson was on drawing the letters L and E.  Here are some pictures of that lesson.  Have your child(ren) work on these letters this week at home.  We use chalk board and write on wipe off boards at school with multi-colored dry erase markers to make drawing letters even more fun!

The smiley face tells students where to start forming their letter.
Ms. Jenny showing some of the students how to hold the dry erase marker with the proper grasp.
This student even added the smiley face to her letter L.
The letter L becomes the letter E when you add two more arms to the L.
Add caption
This student shows off their drawn letter L with pride!