Showing posts with label winter. Show all posts

Saturday, March 5, 2011

Igloo Science - The Beginning of the Great Adventure

Our unit on Igloo's started in January, and the children's interest has waxed and waned according to the weather.  When the first big snow hit we brought in lots of snow for the children to explore.  We also printed several pictures of igloos for them to view.  They looked at how igloos were designed.  Some of the pictures showed igloos that had satellite dishes and indoor lights.  They were amazed. 


The children started trying to form bricks out of the snow using different types of containers.  They talked about compacting the snow and packing the snow down tightly so it doesn't fall apart when the bricks are stacked on top of each other.

The children did not want to stop working in the snow, but their hands became very cold.  They used their problem solving skills and went and got their gloves and mittens out of their cubbies and put them on.  They continued to work for almost an hour building igloos and making towers.


It took some practice but the children became very good at compacting the snow into the cups and creating their "bricks" for their towers and igloos.  Children need the time and opportunity to practice new skills several times.  We brought snow in every day that week and placed out the cups and containers so the children could "play".  As they played they became more confident and their skills improved.

A teachers job is to guide a child's learning.  Ms. Sarah is helping but only after the child asked for help building her igloo.  Ms. Sarah asked open ended questions such as "how can we make the bricks stick together?", "how tall should be make the igloo?" and other questions to help the child expand her vocabulary and problem solve.  They worked together, Ms. Sarah as the child's guide and the child as the leader, the inventor and the creator.  This is when authentic learning takes place.  The teacher and or parent must take a quiet role and let the child discover through trial and error.

This child is building his own igloo.  This is his first attempt and is learning what is working and what is not working when trying to stack the snow blocks on top of each other.


Sometimes the most fun thing about building a structure is knocking it down.

Some of the children wanted to take their snow blocks outside and try to build a real igloo.  Ms. Nancy acted as their guide helping them find a place where other people would not knock down their structure.


The children did research by studying the pictures of igloos and looking on the Internet to see how the blocks were stacked together.  They tried to recreate what they learned by looking at the igloo pictures.

Here is the very start of their igloo adventure.  They also started a milk jug indoor igloo also because they know this igloo might melt before it ever gets build.  Unfortunately, a big slab of snow fell off of the roof of the building and crushed our igloo before we could get much more done, but the children still enjoyed the adventure!

Tuesday, February 22, 2011

Connecting to past learning - from dinosaurs to glaciers

 Earlier this year we did a unit on Dinosaurs (go back through our blog to refresh your memory on paleontology).  During the second semester we are connecting what we are learning now to what we learned earlier this year.  One example is our unit on icebergs and glaciers.  The children created their own glaciers and icebergs out of the abundance of snow  during the January snowstorms.  During the process of freezing and melting the snow each day some of the animals they were playing with in the sensory table became frozen in the iceberg.  Some of the children made the connection to the dinosaur unit back in November in the following way.  Dinosaur bones became trapped in rocks.  The Arctic animals they were playing with became trapped in the ice in the sensory table.  People who tried to get bones out of the ground or ice are called archaeologist.  The children remembered that they were being archaeologist when they started digging the play animals out of the ice in the sensory table.

 They connected their current play to their past play.  This is called LEARNING!  And this critical type of learning cannot be achieved without hands-on, child-directed play. 

You will see more and more play experiences during the second semester that connects current play to past play creating more concrete and long term learning.


These children are excavating, using their tools, chiseling through the frozen ice trying to free the frozen animals from the glaciers.  The students are developing fine motor skills, strengthening their hands for proper grip on writing utensils,  working together as a team to remove the ice, problem solving  how to remove the hard ice without using warm water, how to negotiate space and take turns, using their vocabulary, and most importantly, using their past knowledge learned during our dinosaur unit and applying that knowledge to thier current play in the sensory table.


What animals are frozen in the icy waters?  Which ones are mammals?  Do they get cold?  Why?  Why not?  What keeps animals from getting cold in the icy water?  Make sure you ask good open-ended questions and not just yes and no questions.  You might be amazed what the children will teach you!


Now the children wanted to create their own glaciers and icebergs.  Needless to say, Ms. Sarah, Ms. Nancy and Ms. Carole Dawn spent a lot of time bringing in snow from outside so our young scientists/meteorologists could create their own glacier.  Some of the students even created their own land masses.  Maybe we will have to teach the children about places like Iceland and Greenland and put up maps that show cold places like Antartica.

These students created several glaciers and noticed that rivers formed between them.  Next they wanted to create boats to navigate between the glaciers.  With this activity the students showed an interest and an acuity toward understanding land formations, waterways and how people travel by land and water.  This is one of the most critical ways we find out what the children are interested in and how we can create activities that spark their imaginations.

Sunday, February 20, 2011

icebergs and glaciers

These pictures are not in chronological order because this activity lasted for several days and morphed as the snow fell and the freezing temperatures helped the snow and ice refreeze the ice and water each night when we put the sensory table back outside at the end of each school day.  This activity can be done at home by putting snow into a dish pan or bucket and letting your child play.  When the snow starts to melt put the bucket back outside overnight.  In the morning fill the bucket back up with snow.  Dump the bucket of snow and compacted snow/ice from the day before into a bigger bucket and let your child continue to play.  Repeat this process for as long as you like.  Each time the snow freezes, melts, refreezes and you add more to the refrozen ice pack more layers are added to your homemade iceberg.  You can also cut the iceberg in a half and use a magnifying glass and let your child view the different layers of ice.  You can also add a small amount of food coloring to the water before setting it out to refreeze to show the different layers of water freezing and layering.  The children were very interested in this activity and it lasted for almost two weeks.

We added Arctic animals and Native American people to our ice pack for dramatic play and nature science.

In the background we placed pictures of glaciers in the ocean so the children could see that only a small part of a glacier can be seen above the water and the majority of the glacier sits below the water where it is hidden.

The children started to create craters and caves as we began to let the iceberg melt during the day and refreeze outside at night.  We would add more snow in the morning when we brought the sensory table back inside when school started.


The children stated to create habitats for the animals around day 3 of the experiment.  We started talking about hibernation, why some animals do not freeze in such cold environments and that even though polar bears have white fur they actually have black skin.


Each day the iceberg takes on a new shape depending on how much snow the children add on to the base and how much melting and refreezing has happened the night before.  The children has also started to add some blue coloring to the melted water before they set the sensory table out at night to refreeze.  They noticed that in the pictures of the glaciers hung up by the sensory table the glaciers seemed to have blue layers and they wanted to create that in their glacier so they started to add blue water to their iceberg.  They are enjoying the results.


Exploring the ice world!


I have to admit this is my favorite picture.  It looks like snow art.  As much as I am looking forward to spring, birds, flowers and green on the trees again, this picture reminds me of a winter wonderland.  This picture is also a great seek and find activity if you print it and ask your child to point out the different animals.  Try it.


POLAR BEAR!

Thursday, February 10, 2011

Science Flash Cards | Have Fun Teaching

Science Flash Cards Have Fun Teaching
Just wanted to share a link that I found to a site that has some weather related vocabulary cards that can be printed and used at home to support our science unit. We will be printing these at school and using these in our science center and at circle time to expand vocabulary and explore new science concepts. I hope the new links I post will give you some new tools to use at home with your child(ren). There are many sets of vocabulary cards at this site that you can print and use at home as journal starters, story starters, print two sets for matching games, make a beginning letter sound game, hide the cards and do a seek and find game or play a memory game with the cards. Let us know how you use these cards at home!

Wednesday, February 2, 2011

Building Snowball

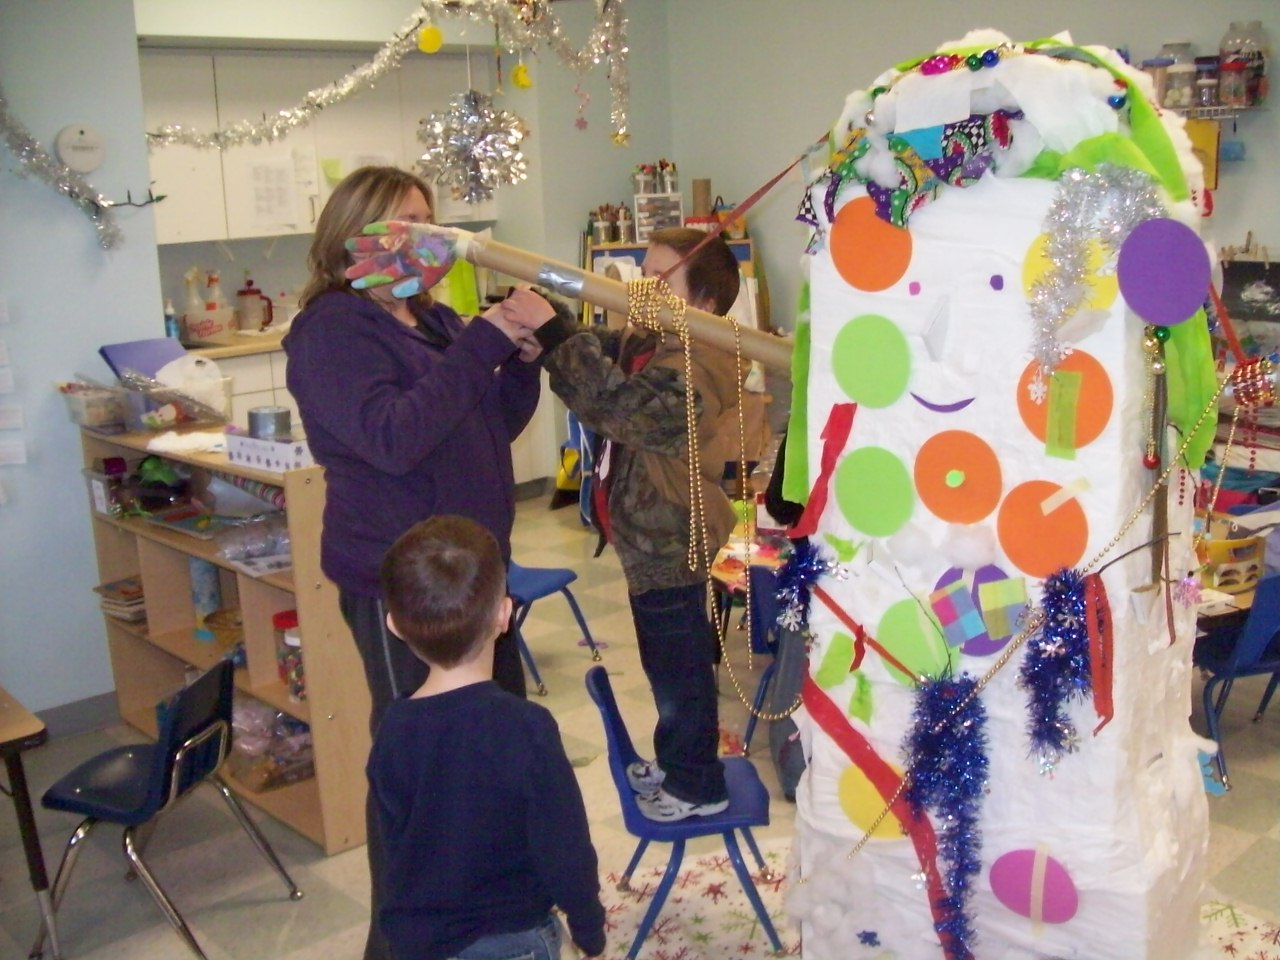
For the past several weeks the AM and PM class have been working on a collaborative group project.  The children wanted to build a snowman "as big as the ceiling".   Well, the ladder would only allow us to build the snowman safely a little over halfway to the ceiling but the children seemed happy enough with that.  The children, under Ms. Nancy's guidance, came up with a plan on how to create this giant snowman.  They wanted to make it out of boxes.  They were asked how to make the boxes tall enough, how to keep them from falling and how to cover the boxes so they looked like a snowman.  Ms. Nancy wrote down all of there answers and made a list for the children.  We then made a donation list for the parents and went to Ms. Rita, the school cook and asked her to save boxes for us.  The parents (you wonderful group of people) started bringing in toilet paper and other materials on the children's list and the building/construction on Snowball began.  This process from start to finish took about three weeks.
As you can tell the children had to work together to stack the boxes.  The needed a ladder to make the boxes taller.  Ms. Nancy took the opportunity to talk to them about Paws Laws and being safe when on a ladder, taking turns (being kind) and holding the ladder for friends (being responsible).  Each child got a turn on the ladder if they wanted it.  The children then had to make sure the boxes would not fall over.  They wanted to tape the boxes together.  They also talked about glueing the boxes but thought tape might work better.  You can also see that the boxes were stacked from biggest to smallest.  Concepts of size, number, stability (basic physics), teamwork, planning, decision making and problem solving were all part of the early stages of this project.  Interest in the early part of the project sometimes took a back seat to the newly fallen snow and for days the boxes sat alone and abandoned.  The nice thing about working with the project approach is that the children are not on a time line to finish a project and can return to it when the interest reemerges.
The next stage of the project involved covering the boxes with something to make it look like a basic snowman.  The children talked about painting the boxes.  They also talked about paper mache, but due to wheat allergies in the classroom that was not an option.  Ms. Nancy told them about using watered down glue and shredded recycled paper.  Using recycled paper was a good way to be kind to the environment and take care of the planet.  The children started with paper mache and them moved on to using toilet paper to wrap around the boxes.  They also used some leftover cotton batting we had left over from a holiday craft we did.  They were really good at wanting to use left over materials and wanted to recycle things that had been used in previous projects so they could Be Kind and Be Responsible.  We really do try to reinforce Paws Laws in all of our lesson plans and in our daily interactions with the children.  We hope you are still using the phrases Be Safe, Be Kind, and Be Responsible at home.

In previous posts you have seen that we have been reading the book Snowballs.  The children made the connection between that book and the snowman they were building.  We had been talking about the kind of art used to make the pictures in the book.  The type of art in the book is called collage (many of the children remember this and if you ask them at home they will tell you what collage is).  They wanted to use the collage technique to decorate their snowman.  They also wanted to use as many recycled items from around the classroom and from past projects as possible.  We undecorated the holiday tree and used many of those items when decorating the snowman.


The children wanted to use the book as a reference while creating their snowman.  They were referring back to the book for information.  This is exactly how research is done.  The children are developing the skills needed for researching for writing papers and reports in their elementary, secondary and collage careers.  This skill will follow them into their professional careers as well.  It was amazing to see them make this connection that they could use a book they were reading as a tool to help them create something new.  Bravo!

These two children work together to create Snowballs face.  One child added eyeglasses to the snowman because he had eyeglasses.  It was very interesting watching how the children made their decisions on how Snowball was going to be decorated, what materials were going to be used to create each feature and who was going to embellish what part of the snowman.  Sometimes two friends would want to do the same thing at the same time and we would stand back and watch them use their problem solving and social language skills to work through the problem.  Only a few times did the teachers have to step in and guide the children through a particularly difficult conversation.


The children used a variety of collage materials to create different body parts for Snowball.  Here they are using crinkle paper and plastic gloves to makes hands.

The AM class decorated on side of Snowball and the PM class decorated the opposite side of Snowball.  Here you can see the AM side of Snowball.  They said they thought their side kind of looked like Spot in the book Snowballs because Spot the Dog snowman had lots of buttons and their snowman had lots of round spots on him.

Here is the PM side of Snowball.  He has glasses and hands that can hold a cup of hot chocolate.  He is also decorated with lots of snowflakes and beads. 


The Family Fun Fair was held last weekend and the book fair was open.  The classrooms were asked to bring down a display if they had one based on a favorite book.  We were not planning on having a display but the children just happened to come up with this project on their own.  We had to find a way to get Snowball down to the book fair.  The children thought that moving him in a wagon would be the safest way to get him all the way down to the other part of the building.  They had to use teamwork to get Snowball safely through the doorways and down the ramp way to Conference Room C.  The children did a great job working together to get Snowball safely to his destination.

Here is Snowball, safely sitting outside the book fair.  There was a contest for the best display.  Families that attended the Family Fun Fair last Saturday voted and Snowball created by the AM and PM children in room 411 won.  They will have a new train table and trains to play with in their classroom next week.  they will pass it on to other classrooms when they are done playing with it, but it was a nice honor to know that their creativity, teamwork and love of reading and art helped them to create a snowman that brought happiness to all that see him (and to know that he will not melt even when the sun finally does come out!).

Monday, January 24, 2011

snow and ice

We hope you all survived the snow and ice January has brought us!  Sorry I haven't posted since the Ronald McDonald House Event.  The snow and ice have put me a little behind to, not to mention the holidays!  Some of December and January will be mixed in together for the next couple of posts until I can get caught up so bear with me.  For this post I am posting about what we did today taking advantage of the snow and ice.  Here are a few pictures of the students doing some snow painting.  I am also including some pictures of the children doing some ice painting  last week before the snow days (who knew we would have the real thing happening?).  Enjoy!  Come back often.  I have a lot of catching up to do so I will be adding a lot of posts over the next few weeks.

In this picture dried tempra paint was put on paper and the children used frozen water to "paint" their pictures! 

The children learn how to blend colors and practice their pincer grip for writing.

This is a great snowy day activity to do at home.  Just freeze some ice cubes, add water color or regular paint (may I recommend the washable kind!) and let the children go crazy.  You may even want to join in the fun.

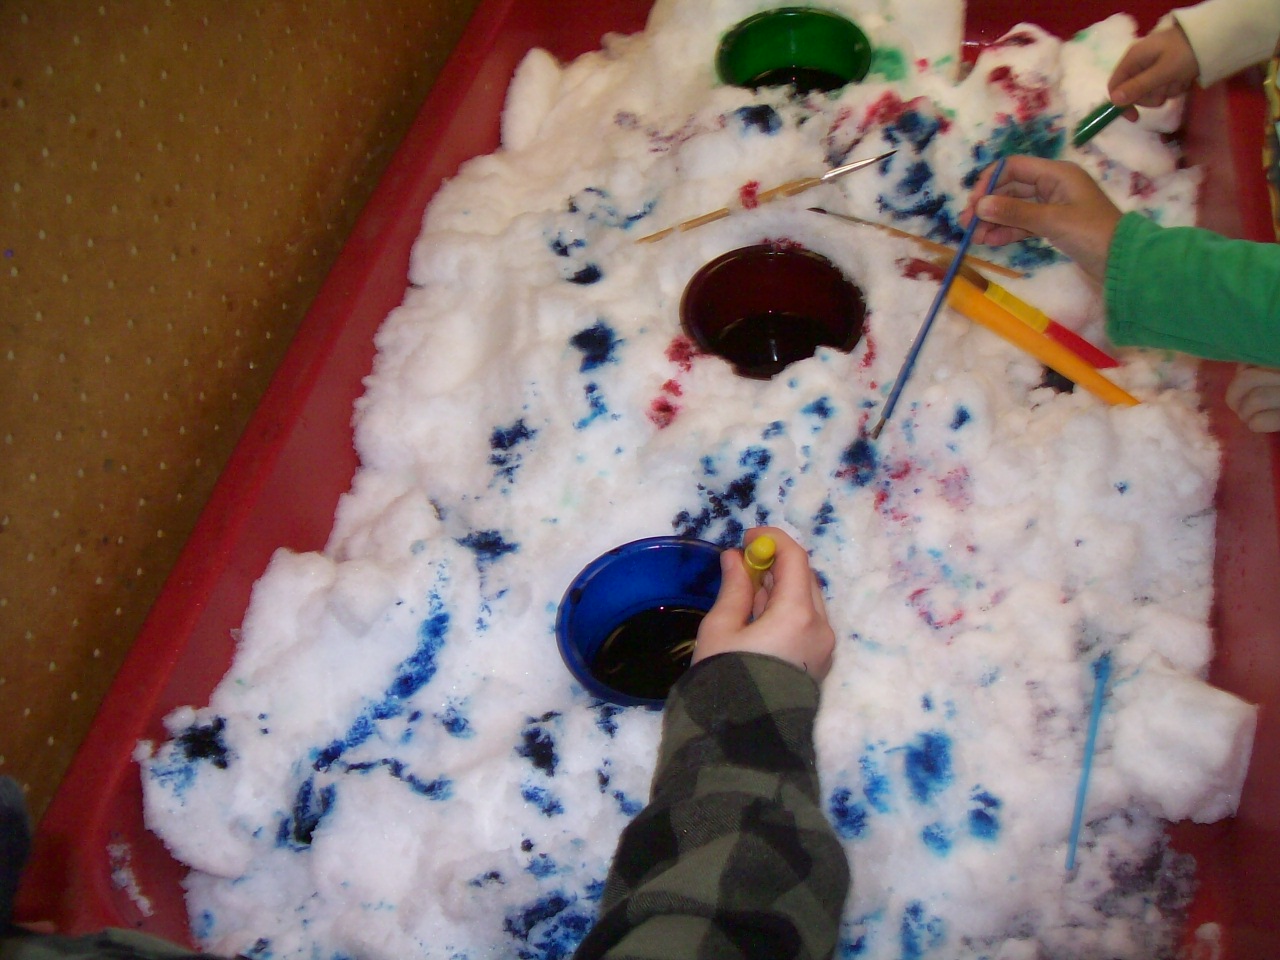
We had some water color paint left over from spray painting snow last week and wondered what we could do with it.  We brought some of the snow in from outside and placed it into the sensory table.  We placed large and small paint brushes in the table with the water color paint and waited to see what the children would create.

A blue snowman!


The children realized that this snow was different from the snow we played with last week.  This snow was "heavier" and "stuck together" better.  Some made snowballs.  Some of the students went and got their gloves and mittens out of their cubbies because their hands got cold but they didn't want to stop playing.  What great problem solvers!

Working together.  Playing collaboratively meaning to play interactively, not just side-by-side.  These two students are talking back and forth, working together to create a picture together, discussing what colors to use, how to take turns and who should paint where.  They were using lots of social and descriptive language.

Again, next time their is a snow day, fill up the bath tub or sink with snow, color some water with food coloring (watch out though, it will stain) or water down some paint, get out some paint brushes and let your child(ren) paint a masterpiece.  Better yet, paint with them.  Build sculptures inside or outside and paint them.  Don't forget to take a picture and send it into school with them so they can tell us all about it.  Believe it or not, this is where the real learning takes place.  It is not just play.  Size, shape, colors, number, language, sharing, taking turns, working together, problem solving and just plain having fun and making memories all are vital to your child's long term development.

In the afternoon class one of the other teachers gave them some ice cycles to examine.  Even though our lesson plans didn't have ice cycles in them the kids taught us a thing or two!  They put them in the sensory table and started painting them with the water color paint.  They turned into beautiful works of 3-D art!

One thing we have learned as teachers, always listen to the children.  They see the world in ways that we have forgotten as adults.  They saw the ice cycles as something different than just plain old frozen water dripping off the building.  They saw them as dazzling, magical and amazing objects to be painted, explored and manipulated into something new and even more beautiful than they were before.  I think that is why we love our jobs so much, we get to see the world fresh and new each day again, and not the way we are taught to see it as adults.  See the snow and ice as the children do.  Glittering.  Soft.  Fun.  Cold.  Yummy.  Not as we are taught to see it as adults.  Inconvenient.  Annoying.  Difficult.  Sometimes just changing your perspective can bring about joy in places you forgot it existed..

So, until next time, try to find a little fun in the snow.  It will be gone soon and before you know it the days will be long again and we will be in shorts and it will be 100 degrees outside and we will be wishing we would have enjoyed the snow while it was here.  With that said, drive safely.